
 1610
1610
PCMTec Editon Required: One-Car Workshop or Workshop.
Problem: You need to change the VIN within a Custom OS file. As the Serial and VIN have embedded within the Custom OS the firmware cannot be changed using the normal methods and the Custom OS file must be recreated.
Solution: We create a new stock file and re-run the Custom OS Wizard via the following steps.
The guide assumes your previous Custom OS file has been named "Previous Custom OS.tec".
Press "Calibration Tools" -> "Create Stock File/Calibration Merge".

Select "Create Stock File From Existing File" and then load your previous custom OS tec file with the old/wrong VIN.


Press "Save/Open File" and save the file as "New Stock File.tec".

Press "Compare/History" -> "Load Compare File" and load the previous Custom OS file that you are recreating ("Previous Custom OS.tec").

Click anywhere within the compare tree view then select all items via Ctrl + A then press space. Once selected press "Apply" to copy the values over to the stock file.

If you wish to change the VIN you must do it now via locating Navigator -> Strategy -> Vehicle Identification Number and entering the new VIN.

Save the file as "Stock OS with values copied and new VIN.tec".
Select "Calibration Tools" -> "Custom OS Configuration Wizard".

Press "Load All Defaults From Existing File" from the bottom left hand corner and select the original Custom OS file that you are recreating "Previous Custom OS.tec".

The wizard will now replicate your previous file. Review these settings to make sure they are what you expect.

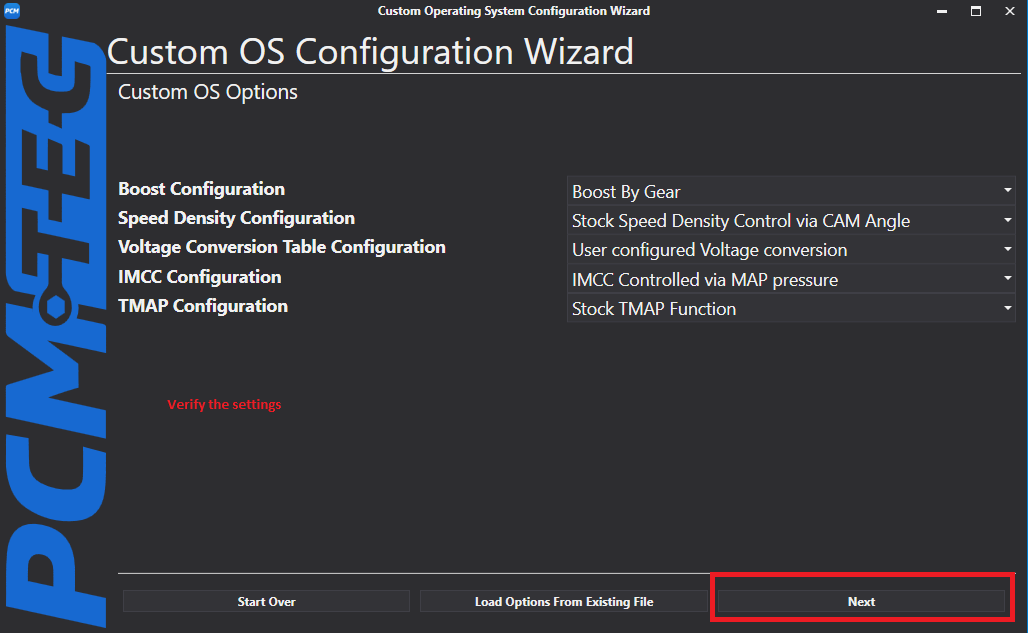
Press "Next" and review the next page (depending on what type of custom OS you created you may not see all of these pages or options).

If you are recreating a Flex/Multi Tune you will now see the table selection page. The tune and table setup should match the previous Custom OS. Review the table/scalar setup to ensure it matches what you had previously.
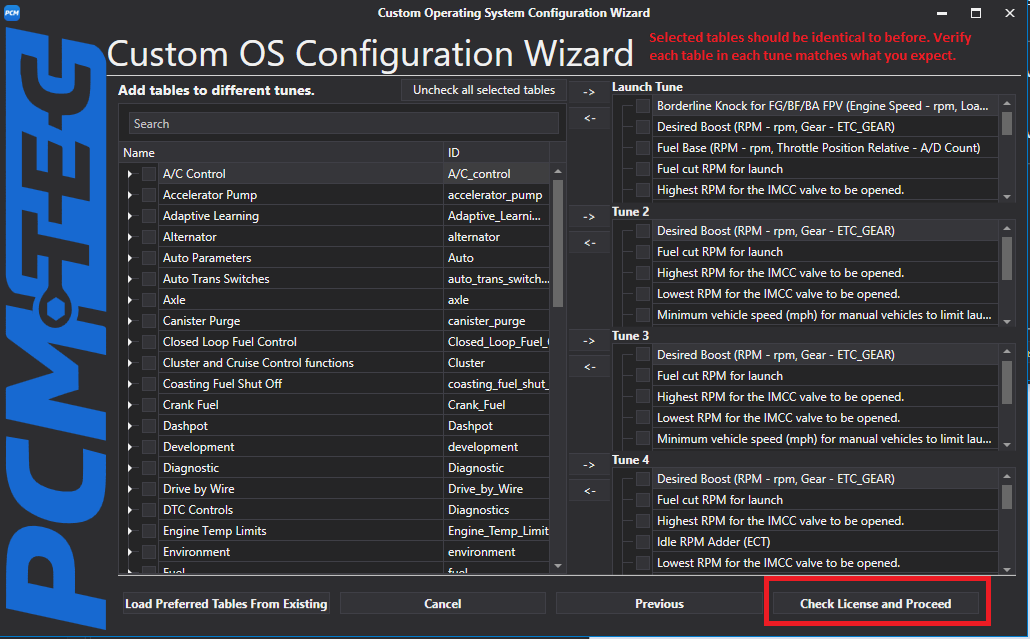
Press "Check License and Proceed" and save the new file as "Custom OS re-created with stock values.tec".
Press "Next" and exit the Custom OS Wizard. Now press "Compare/History" -> "Load Compare File" and load the previous Custom OS File, "Previous Custom OS.tec". This is the same process and steps as you did earlier in the guide and will copy over the flex/multi-tune tables.
Once again click anywhere within the compare tree view, press Ctrl + A then space to select all of the previous Custom OS tables/scalars. Finally, press Apply to copy them over.

You will now have a freshly created Custom OS with a different VIN number. Press "File" -> "Save As" and save the file as "New Custom OS with new VIN and all values.tec".
Flash the file into the vehicle.

